Sunday, March 11, 2018

New blogging website

Just wanted to let the community know that I no longer user blogger to blog by articles.

As of this month, I have started blogging on my own website called OzPerf.

Thursday, December 7, 2017

Modeling - Probability distribution and JMeter code


Skewness:
"In probability theory and statistics, skewness is a measure of the asymmetry of the probability distribution of a real-valued random variable about its mean. The skewness value can be positive or negative, or undefined."  (source wikipedia)


Exponential:
"In probability theory and statistics, the exponential distribution (also known as negative exponential distribution) is the probability distribution that describes the time between events in a Poisson point process, i.e. a process in which events occur continuously and independently at a constant average rate." (source wikipedia)

When designing application simulation model for performance testing you will come across scenarios which will require you to use different probability distribution to emulate correct production behavior. For example, average # of items per order, number of sessions or think time between pages.

The code below allows you to generated a skewed & exponential distribution for such a case in JMeter to emulate correct behavior as observed in production.

Skewed distribution code
min = VALUE; //update this value to minimum value expected in the distribution
max = VALUE; //update this value to maximum value expected in the distribution
bias = VALUE; //update this to a value against which  the distribution should be biased toward
influence = 1; //[0.0, 1.0] - 1 means 100% influence
rnd = Math.random()*(max-min)+min;
mix = Math.random()*influence;
result = rnd *(1 - mix) + bias * mix;

NOTE: This code is from stackoverflow and I don't remember the link to it. If you do, please let me know.

Exponential distribution code
Avg = VALUE; //update this value to reflect mean value for the distribution 
MIN = VALUE; //update this value to minimum value expected in the distribution
result = (long)(-(double)Avg*Math.log(Math.random()))+MIN;

Example (Exponential distribution):
MIN = 1;
Avg = 2.5;
result = (long)(-(double)Avg*Math.log(Math.random()))+MIN;
If above code is executed for 200 iterations/thread, it will generate the values depicted in the histogram below. More iterations executed, better the distribution will look like. For testing, two threads were used.


NOTE: If you want to have a hard boundary, add an if condition in the code to check against a MAX value.

Example (Skewed distribution):
min = 1;
max = 10;
bias = 3;
influence = 1;
rnd = Math.random()*(max-min)+min;
mix = Math.random()*influence;
result = rnd *(1 - mix) + bias * mix;

If above code is executed for 200 iterations/thread, it will generate the values depicted in the histogram below. More iterations executed, better the distribution will look like. For testing, two threads were used.


Use beanshell sampler to generate the value and save it in a variable. Pass variable into the loop controller to control it. Below is the code in beanshell sampler.


NOTE:
1: Make sure you run a few tests to get the distribution right to reflect what is happening in production.
2: If you have a better code to generate probability distribution be it exponential or any other kind, I would love to  know.

Tuesday, May 26, 2015

Merging Wireshark files

Note to myself, If you want to merge multiple wireshark files, save & execute the following command from a batch file.
Cmd /V:on /c {mergecap wireshark utility} -w {mergefile name} {files to merge}

where:
{mergecap wireshark utility} - mergecap.exe file path
{mergefile name} - name of the merged file to be generated
{files to merge} - wireshark files that need to be merged

Example:
Cmd /V:on /c "c:\Program Files\Wireshark\mergecap.exe" -w allWireshark.pcap wiresharkDump*.pcap

Run the batch file from within the same folder where all wireshark files are located.


Tuesday, September 24, 2013

SoapUI - using WHERE IN clause and Groovy code to concatenate strings

Recently, I worked on a project that was using SoapUI Pro to test an application. One of the testers had a working test case in SoapUI but wanted it done differently and therefore, approached me for a solution. Following outlines the scenario and a quick groovy code I wrote to address what he really wanted.

Scenario:
He was connecting to a database using SoapUI JDBC step and retrieving more than one result for a SQL query. He was then using FOR loop to iterate through all the values. In the FOR loop, he had another JDBC step which took result value as a parameter and returned an appropriate response (using assertion to validate the response).

What he wanted:
He wanted to get rid of FOR loop and pass all the values returned from the first JDBC step into second JDBC step.

Solution:
The solution I came up with was to concatenate all the values from the first JDBC step using a groovy code and then pass the returned string from the code into a separate JDBC step. Also change the SQL query in the final JDBC step to use WHERE IN clause.

For blogging purpose, I am connecting to MySQL database on my local machine using SoapUI Pro 4.5.2 (trial version).

I have created two tables in MySQL database. First table is a class which contains StudentName and ClassName. Second table is a Subject with StudentName and Subject fields. For code demonstration purpose, I will be querying the database to return me names of all the stundent that are in Class 3. Then I will concatenate the names using groovy code and pass it to a separate JDBC step to get me the StudentName and the Subject they are enrolled in.

NOTE:
  • This code does not cater for all the possibilities as it is only for blogging purpose. 
  • Also make sure you are adding the MySQL JDBC driver in SoapUI ext folder so you can connect to the database.
  • I am sure the code below can be refined further. saving xmlRecCount.toInteger() value to a parameter.
Steps:
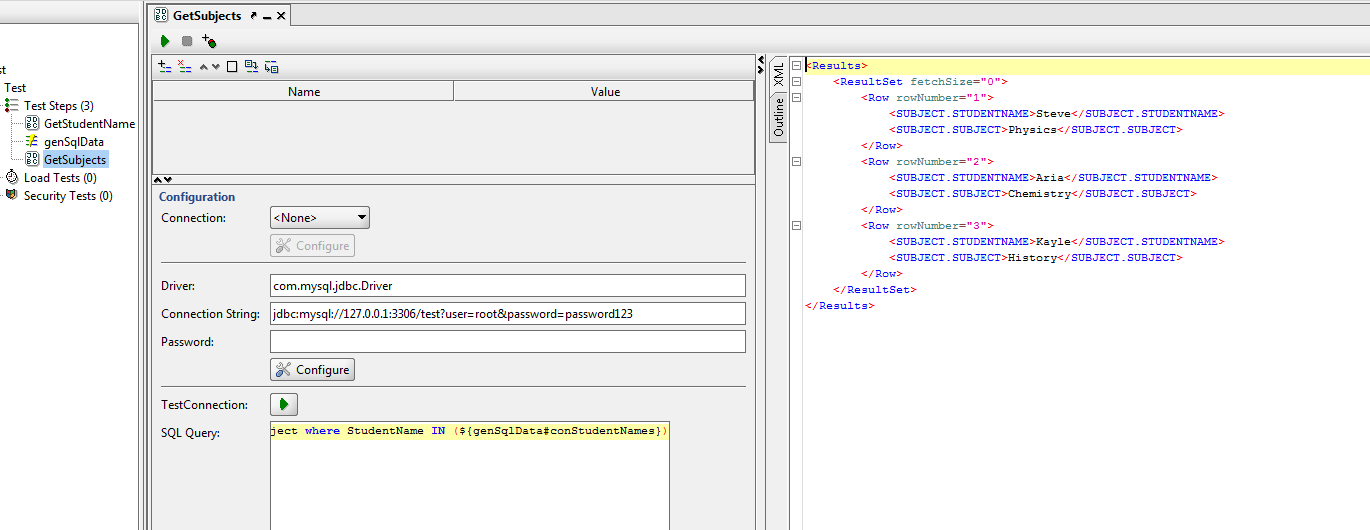
  1. Add a JDBC Step to the test case. This JDBC step with query the class table and return student names that are in class 3. 
  2. Add a DataGen step to the test case. In this step create a parameter with "Type" as "Script". This Script will take response from the first step, concatenate all the student names into one string and pass it to the parameter. 
  3. Finally add another JDBC step to the test case. This step will query the Subject table uisng WHERE IN Clause and IN value will be the parameter created in step 2 above.
Code:
def groovyUtils = new com.eviware.soapui.support.GroovyUtils(context)
def holder = groovyUtils.getXmlHolder("GetStudentName#ResponseAsXml")

def concSqlString=""   //initialize parameter string concSqlString
def cnt =1             //initialize counter

//Get the total count of records that have the CLASS.STUDENTNAME
def xmlRecCount=holder["count(//Results[1]/ResultSet[1]/Row/CLASS.STUDENTNAME)"]


//check if only one row is returned
if (xmlRecCount.toInteger()==1)
{
      node = holder.getNodeValue('//Results[1]/ResultSet[1]/Row/CLASS.STUDENTNAME')
     concSqlString=concSqlString +"\""+node+"\""
}
else{
        //for each node, concatenate the node value to concSqlString variable
 for (node in holder['//Results[1]/ResultSet[1]/Row/CLASS.STUDENTNAME'])
 {
 if(cnt<xmlRecCount.toInteger()){
  concSqlString=concSqlString+"\""+node+"\","
  cnt=cnt+1
 }
 else
 concSqlString=concSqlString +"\""+node+"\""
 }
}

//return the concSqlString 
return concSqlString

Saturday, August 10, 2013

LoadRunner - Selecting random value using lr_paramarr_random function

In performance testing, it is really important to simulate a realistic user path through an application. For example, randomly select an image link from a gallery or select a share from a share list. In such situations, you can use the LoadRunner lr_paramarr_random function to select a random value from a captured parameter array. Similarly, you can also write a code to do the same.

Before you use the above function, you will need to use web_reg_save_param function to capture all the ordinal values. This can be achieved by passing "ORD=ALL" into the function.

The following code demonstrates the use of lr_paramarr_random function. The code saves link Ids using  web_reg_save_param function and then uses lr_paramarr_random function to randomly select an Id value. The value is passed as a parameter in web_text_link function to navigate to the appropriate webpage.

Action()
{

 //Capture all the Link IDs
 web_reg_save_param("LinkID","LB=id=\"","RB=\" href=\"default.aspx?content=business_","ORD=ALL",LAST);

 lr_start_transaction("VU01_01_Homepage");
 web_browser("website", 
  DESCRIPTION, 
  ACTION, 
  "Navigate={WebsiteUrl}", 
  LAST);

 lr_end_transaction("VU01_01_Homepage",LR_AUTO);

 lr_think_time(10);


 //Save a randomly selected ID to a Parameter
 lr_save_string(lr_paramarr_random("LinkID"),"RandomLink"); 

 //Printout the randomly selected parameter
 lr_output_message("%s",lr_eval_string("{RandomLink}"));

 //Navigate to the appropriate webpage associated to the ID
 lr_start_transaction("VU01_02_RandomLink");

 web_text_link("Links", 
  "Snapshot=t2.inf", 
  DESCRIPTION, 
  "Id={RandomLink}",
  ACTION, 
  "UserAction=Click", 
  LAST);

 lr_end_transaction("VU01_02_RandomLink",LR_AUTO);
 
 web_browser("Sync", 
  "Snapshot=t3.inf", 
  DESCRIPTION, 
  ACTION, 
  "Sync", 
  LAST);

 return 0;
}
Following is a screenshot of replay log, displaying the random id's selected for each iteration. It also displays the values captured using web_reg_save_param function.

Sunday, June 23, 2013

SoapUI pro - DB2 Invalid database URL syntax issue

Recently, I was trying to connect to DB2 database using SoapUI pro 4.5.1 and got the following error message "com.ibm.db2.jcc.am.SqlSyntaxErrorException:[jcc]...Invalid database URL syntax: ...ERRORCODE=-4461,SQLSTATE=42815".


On further analysis, I discovered that the default connection string for IBM DB2 Drivers in SoapUI did not have a semicolon at the end of password variable.


Therefore to solve the above issue, you can use any of the following approaches:

1: add the semicolon at the end of the connection string template for DB2. The connection string templates are available under the option soapUI Preferences - JDBC Driver Properties.

2: Create a custom connection string with semicolon in your test case.


3: If you don't want to use either  of the above approaches, third approach is to add semicolon at the end of the Password variable text.

NOTE: To connect to DB2 database, you will require to add db2jcc.jar and db2jcc_licence_cisuz.jar files in the SoapUI ext folder.

Tuesday, May 14, 2013

Groovy - Saving CouchDB runtime statistics json file to excel file

Last year, I wrote a blog on how to get CouchDB Runtime Statistics and saving it as a json file. However, want I really wanted was to save and open  the file in excel. Therefore, I wrote a Groovy script to read Runtime Statistics data from json file and save all the Key values into an excel file.

Below is the prerequisite to execute the script as well as the script.

NOTE: Their already exists a python script to capture the CouchDB runtime statistics.

Prerequisite:
  • Download and Install Groovy Console application.
  • Download and copy  jxl.jar file into the Groovy lib folder.
Script:
import groovy.json.*
import jxl.*
import jxl.write.*


Parameter = ["Group","Key","current","max", "mean", "min", "stddev","sum"]; //couchDB worksheet headers

exlfile = "C:\\Harinder\\Groovy\\couchDB.xls"; //excel file path

if   (new File(exlfile).exists())  //check if file exists esle create a new one, write label and close the file
{
    println "File already exists";
}
else
{
    WritableWorkbook workbook1 = Workbook.createWorkbook(new File(exlfile))
    WritableSheet sheet1 = workbook1.createSheet("couchDB", 0);
    //Label label = new Label(column, row, "Text input in Excel");
    for (int iheader=0; iheader<8;iheader++)
    {
        Label label = new Label(iheader, 0, Parameter[iheader]);
        sheet1.addCell(label);
    }
    workbook1.write();
    workbook1.close();
}

def reader =new BufferedReader(new FileReader("C:\\Harinder\\Groovy\\couchDB.json")); //create a json file into a buffer
def jparsedData =new JsonSlurper().parse(reader);


/*open an exisiting excel file, write Key values and close the file*/
Workbook workbook = Workbook.getWorkbook(new File(exlfile)); 
WritableWorkbook copy = Workbook.createWorkbook(new File(exlfile),workbook);

Groups = jparsedData.collect{a,b->a}.reverse(); //Groups=["couchdb","httpd_request_methods"...]

WritableSheet sheet = copy.getSheet(0);
int groupCount=1;
int rowCount=1;
for (int gCount=0;gCount<Groups.size();gCount++)  //iterate through the Groups
 {   
    tGroups=Groups[gCount]; //assign Groups[gCount] value to a temporary variable tGroups
    sheet.addCell(new Label(0,groupCount,  tGroups)) //save tGroups into the sheet
    Keys = jparsedData."$tGroups".collect{a,b->a}.reverse();  //collect all the Keys associated to Group[gGroup]
    for (int kCount=0;kCount<Keys.size();kCount++) // iterate through all the Keys and save their min,max,count,mean,stddev,sum values into the sheet
     {
       tKeys=Keys[kCount];
       rowCount=kCount+groupCount; 
       sheet.addCell(new Label(1,rowCount,  tKeys));
       sheet.addCell(new Label(2,rowCount,  jparsedData."$tGroups"."$tKeys".current.toString()));
       sheet.addCell(new Label(3,rowCount,  jparsedData."$tGroups"."$tKeys".max.toString()));
       sheet.addCell(new Label(4,rowCount,  jparsedData."$tGroups"."$tKeys".mean.toString()));
       sheet.addCell(new Label(5,rowCount,  jparsedData."$tGroups"."$tKeys".min.toString()));
       sheet.addCell(new Label(6,rowCount,  jparsedData."$tGroups"."$tKeys".stddev.toString()));
       sheet.addCell(new Label(7,rowCount,  jparsedData."$tGroups"."$tKeys".sum.toString()));
     }
     groupCount=rowCount;
 }

copy.write()
copy.close()

Script steps:
  1. Check couchDB excel file exists. If it does not, create it and add all the necessary headers to a worksheet and close the file.
  2. Read and parse the json file.
  3. Open the couchDB file for writing.
  4. Navigate through the parsed json data and save all the Group names.
  5. Navigate through each group name in step 4 and save all the Keys associated to it.
  6. For each Keys saved in step 5, navigate through it and save all the associated values into excel file.
  7. Once done, close the worksheet.

Result:
 

Monday, April 8, 2013

SOASTA CloudTest Lite VM - Switching to graphics mode

Today, I downloaded CloudTest Lite VM from SOASTA website so I could have a look. After starting it up with VMWare Player, I got the following screen.

To switch to graphic mode, which is what we want, you need to hit
CTRL+ALT+F7

After hitting the keys, you will see the Welcome CloudTest Lite Screen.

Sunday, April 7, 2013

How to compare two heap dumps and view result using jhat

The jhat is a Java Heap Analysis Tool that comes as a part of the JDK. This tool can be found in the JDK bin directory. For more information on jhat refer to Java SE documentation.


Following is the step to compare two heap files using jhat:

jhat -baseline baseline.hprof newbaseline.hprof

If successful, jhat will start an http server on default 7000 port. To view the result, navigate to
http://localhost:7000/ 


Classes
Some of the classes you might see
http://localhost:7000/allClassesWithPlatform/
http://localhost:7000/showRoots/
http://localhost:7000/showInstanceCounts/includePlatform/
http://localhost:7000/showInstanceCounts/
http://localhost:7000/histo/
http://localhost:7000/finalizerSummary/
http://localhost:7000/oql/


Tuesday, April 2, 2013

Generating Websphere verboseGC Graph in LoadRunner Analysis tool

Few weeks ago, I was working for a client and I wanted to analyze Websphere Application server verboseGC logs. I could have used tools such as IBM PMAT but what I really wanted was to merge verboseGC graph with response time graph in Load Runner and this required a lot of manual work. Therefore, I modified existing Silkperformer vbscript to Websphere verboseGC vbscript.

For the blogging purpose, this script saves only handful of verboseGC attributes into CSV file. You can then import the csv file as an external monitor in Load Runner Analysis tool.

NOTE: You can modify this script to suit your requirements. Also make sure everything is contained within verbosegc tag in your verboseGC log file. See the example below.

Please read the following blog on how to generate the CSV file.

Websphere verboseGC Vbscript
Option Explicit
 
Dim xmlDoc
Dim af, gc, timestamp, gcIntervalms, DateTimeArray, afDate, afTime, afIntervalms,minimum,requestedBytes,Totalms,gcTotalms,gcTotal,Time
Dim reportFile, outputFile
Dim myFSO, fileHandle
 

'Murray Wardle code
Set xmlDoc = CreateObject("Microsoft.XMLDOM")
 
Const ForReading = 1, ForWriting = 2, ForAppending = 8
 
If Wscript.Arguments.Count = 0 Then
    msgbox "Please specify the overview Report file to process"
Else
 
 ' Get report file name & set output filename
    reportFile = Wscript.Arguments(0)
 outputFile = Left(reportFile, Len(reportFile)-3) + "csv"
 
 xmlDoc.async = false
 xmlDoc.SetProperty "SelectionLanguage", "XPath"
 xmlDoc.SetProperty "ServerHTTPRequest", True
 xmlDoc.validateOnParse = False
 xmlDoc.resolveExternals = False
 
 'load overview report
 xmlDoc.load(reportFile)
 xmlDoc.setProperty "SelectionLanguage", "XPath"
 
 'open csv file to dump results into
 Set myFSO = CreateObject("Scripting.FileSystemObject")
 Set fileHandle = myFSO.OpenTextFile(outputFile, ForWriting, True)

'Modified code for verboseGC
fileHandle.WriteLine("date,time,afIntervalms,requestedBytes,gcIntervalms,gcTotalms,Totalms")
 
For Each af In xmlDoc.SelectNodes("//af")
  timestamp = af.getAttribute("timestamp")'get af timestamp attribute value
  DateTimeArray=Split(timestamp," ",-1,1) 'split the date time into array
  afDate=FormatDateTime(DateTimeArray(1)+"/"+DateTimeArray(0)+"/"++DateTimeArray(3),vbShortDate) 'format into date
  afTime=FormatDateTime(DateTimeArray(2),vbLongTime) 'format into time
 
  afIntervalms=af.getAttribute("intervalms") 'get af intervalms attribute value
 
  For Each minimum In af.SelectNodes("./minimum") 'get minimum requested bytes value
    requestedBytes = minimum.getAttribute("requested_bytes")
  Next
  For Each gc In af.SelectNodes("./gc") 'get gc intervalms value
    gcIntervalms = gc.getAttribute("intervalms")
  Next
  For Each gcTotal In af.SelectNodes("./gc/time") 'get total gc time value
    gcTotalms = gcTotal.getAttribute("totalms")
 Next
 For Each Time In af.SelectNodes("./time")
    Totalms = Time.getAttribute("totalms") 'get total time value
 Next   
 fileHandle.WriteLine(afDate+","+afTime+","+afIntervalms+","+ requestedBytes+","+ gcIntervalms+","+gcTotalms+","+Totalms)
Next
fileHandle.Close
end if
Websphere Application verboseGC log Example


CSV Output


VerboseGC graph in LoadRunner

Saturday, February 2, 2013

Failed to initialize dtrace message

Recently, I wanted to learn DTrace programming, so I installed OpenSolaris 10 virtual machine on my laptop. After installation, I tried to execute a simple dtrace command but got the following message:

"dtrace: failed to initialize dtrace: DTrace require additional previleges"


Solution:
By default, when you install OpenSolaris 10, your primary profile is set as 'Primary Administrator' and role as 'root' but you are logged in as a normal user without root privileges. Therefore, to solve my issue I had to 'su' as 'root' and run DTrace commands.


You can check what role and profile you are assigned after installation by running following command:    cat /etc/user_attr


NOTE: If you don't want to log in as a root each time you want to run the DTrace command, you can read the following article on how to give DTrace privilege to a normal user.

Sunday, January 20, 2013

Macro to delete multiple comments in MS Word 2003

There are times when a reviewed Test plan doc(or someother MS Word document) comes back with multiple comments that need addressing. Once these have been addressed, there is no option to delete all comments in the MS Word like "Accept All Changes in Document" option. You can delete each comment after you have address it (manually) or use the following vbs macro to delete all the comments at once.


Sub RemoveComments()
Dim commCount As Integer
Dim oDoc As Document
Set oDoc = ActiveDocument
For commCount = 1 To oDoc.Comments.Count
   oDoc.Comments(1).Delete
Next
End Sub

Alternatively you can use this macro.


Sub RemoveComments()
Dim oDoc As Document
Set oDoc = ActiveDocument
oDoc.DeleteAllComments End Sub

NOTE: In MS Word 2007 and later, there is an option to delete all comments at once.

Monday, January 14, 2013

SQL vs NoSQL

Interesting talk on SQL vs NoSQL by Ken Ashcraft and Alfred Fuller.


Following scorecard taken from the talk.

Friday, October 5, 2012

IBM HeapAnalyzer java.lang.OutOfMemory

You might get java.lang.OutOfMemory error in IBM HeapAnalyzer while processing heapdumps.
Try increasing the JVM heap size and see whether it fixes your OutOfMemory issue before trying other options.


 Following is how you invoke HeapAnalyzer with a heap size parameter in windows.


Finally if your OutOfMemory Issue is fixed, you should able to see the heap dump analysis in HeapAnalyzer.


Thursday, October 4, 2012

Chrome About URL

I was playing around with Chrome's about feature few days ago but forgot the actual URL. Therefore this post is to remind me the actual URL. The URL is chrome://about/. There are some useful URLs to know in the list and they are:
  • chrome://dns/
  • chrome://tracing/
  • chrome://profiler/
  • chrome://net-internals/
  • chrome://memory-redirect/
  • chrome://flags/

Tuesday, September 18, 2012

Copying parameters in LoadRunner

Scenario:
You are using same parameter(s) in more than one script and you don't want to manually create them again for each script. So how do you go about copying the parameters from an existing script.

For example:
The following parameters have already been manually created in Script 1 and same parameters are also required for Script 2.
  • DateTime
  • IterationNo
  • RandNo
  • VuserID

Rather than manually creating them, you can copy these parameters from Script 1 and this is how you do it.

Steps:
1: Navigate to Script 1 folder and open file that ends with "prm" extension. This file defines all the parameters and their attributes.


2: Copy the parameters & their attributes and paste into the parameter file of script 2.


3: Save the parameter file. Now open script 2 and navigate to parameter list. You will now noticed that the parameters have been successfully copied.


Saturday, September 8, 2012

Generating UUID in Loadrunner

There have been multiple times where I needed to generate UUID (Verion 4) in Loadrunner but there is no inbuild function to do so. Therefore, I had to either create or modify functions to satisfy my need.

NOTE: Loadrunner does have a function(lr_generate_uuid) for UUID but it does not generate your standard UUID.

Below are three different UUID functions that I normally use depending on the requirement.

For example, If only requirement is that UUID be 32 hexadecimal digits then I will use simple LR UUID to generate it. If there are proper checks in place to see the UUID generated is valid then I will use a proper UUID function's. Therefore you can select which one you want to use depending on your requirement.

Simple UUID - this is a simple 32 hexadecimal digits. You can generate hexaadecimal in Loadrunner using %x or %X Random number.

Following screenshot shows how to generate a random Hexadecimal.


Lr UUID - this function generates 32 hexadecimal digits UUID using Version 4(random) variant. This is the most common format I have seen applications use.

Win UUID - this function uses windows inbuild CoCreateGuid function (ole32.dll). The original code is written by Scott Moore and I have modified it a little bit.

NOTE: I have left the deallocation of pointer for you to do in the code.

#define Hexlength 50  //Max length

char *lr_guid_gen(); //explicitely declare the function
char *lr_uuid_gen(); //explicitely declare the function

Action()
{   

  char *Win_UUID=0; //declare window function UUID variable 
  char *slr_UUID=0; //declare loadrunner function UUID variable
  char *lr_uuid;  //declare UUID variable

  Win_UUID=(char *)malloc(sizeof(char)); //allocate dynamic memory
  slr_UUID=(char *)malloc(sizeof(char)); //allocate dynamic memory

  Win_UUID=lr_guid_gen(); //execute Window UUID function
  slr_UUID=lr_uuid_gen(); //execute LR UUID function
  lr_uuid=lr_generate_uuid(); //assign result generated by loadrunner internal
  function to lr_uuid

  /*output a simple UUID*/
   lr_output_message("smp_UUID: %s",lr_eval_string("{sHex}{sHex}-{sHex}-{sHex}-{sHex}-{sHex}{sHex}{sHex}"));
 //you could use something like this as well -> lr_output_message("smp_UUID: %s",lr_eval_string("{sHex}{sHex}-{sHex}-{FourHex}-{sHex}-{sHex}{sHex}{sHex}"));

  /*output loadrunner UUID*/
  lr_output_message("slr_UUID: %s",lr_eval_string(slr_UUID));

  /*output window generated UUID*/
  lr_output_message("Win_UUID: %s",lr_eval_string(Win_UUID));

  /*output base64 UUID*/
  lr_output_message("%s",lr_uuid);
 
 /*frees uuid created by lr_generarte_uuid*/
 lr_generate_uuid_free(lr_uuid);
 
 return 0;

}


/*This function uses windows ole32 CoCreateGuid function to generate UUID*/
char *lr_guid_gen()

{

    typedef struct _GUID

    {

        unsigned long Data1;

        unsigned short Data2;

        unsigned short Data3;

        unsigned char Data4[4];

    } GUID;

    char guid[Hexlength];
    GUID m_guid;

    lr_load_dll ("ole32.dll");

    CoCreateGuid(&m_guid);

    sprintf (guid, "%08lx-%04x-%04x-%02x%02x-%02x%02x%02x%02x%02x%02x",

    m_guid.Data1, m_guid.Data2, m_guid.Data3,

    m_guid.Data4[0], m_guid.Data4[1], m_guid.Data4[2], m_guid.Data4[3],

    m_guid.Data4[4], m_guid.Data4[5], m_guid.Data4[6], m_guid.Data4[7]);


    return guid;
}


/*This function uses loadrunner random numbers to generate version 4 UUID*/
char *lr_uuid_gen()
{
  char uuid[Hexlength];
  switch (atoi(lr_eval_string("{RandNo}")))
  {
   case 1:
    sprintf(uuid,lr_eval_string("{Hex}{Hex}-{Hex}-{FourHex}-{aHex}-{Hex}{Hex}{Hex}"));
    break;
   case 2:
    sprintf(uuid,lr_eval_string("{Hex}{Hex}-{Hex}-{FourHex}-{bHex}-{Hex}{Hex}{Hex}"));
    break;
   case 3:
    sprintf(uuid,lr_eval_string("{Hex}{Hex}-{Hex}-{FourHex}-{EightHex}-{Hex}{Hex}{Hex}"));
    break;
   case 4:
    sprintf(uuid,lr_eval_string("{Hex}{Hex}-{Hex}-{FourHex}-{NineHex}-{Hex}{Hex}{Hex}"));
    break;
   default:
    break;
  }
 return uuid;
}


Output:
Action.c(23): smp_UUID: 492ec6db-dcaf-fb6d-1009-72a542e26ee7
Action.c(26): slr_UUID: c4fbde14-4f41-4963-8400-32f77f6e0633
Action.c(29): Win_UUID: cee9f8fd-3715-4183-b367-a4c13b84a7c8
Action.c(32): LBase_64: J3+Lpj2t20KzpBSgg0e5Bg==

Action.c(23): smp_UUID: 65ea1bc1-8434-e05b-92f5-7e23a0f7e253
Action.c(26): slr_UUID: 358390f7-2405-4b03-8be4-b8c61b90a2b6
Action.c(29): Win_UUID: 75d74eb9-a2bf-42b4-b114-61d634a2c7db
Action.c(32): LBase_64: uzxvhpLXP0ifUjMSqzngCQ==

Action.c(23): smp_UUID: 0a86ce02-7413-1da3-bd39-63fc4cb9d60e
Action.c(26): slr_UUID: 726546c5-500d-4ef2-a27e-f447bb925143
Action.c(29): Win_UUID: db65a02f-1ca1-4fb3-ab22-0e41088b1633
Action.c(32): LBase_64: IJV65qREQUOe5CVwcE5aVQ==
 
Action.c(23): smp_UUID: 6678a6ac-3356-eb2f-63e6-02fe5a5185f2
Action.c(26): slr_UUID: acddc8f9-746d-4655-838c-7802483e06bb
Action.c(29): Win_UUID: e7a7ff1c-4019-4053-a51a-7567582d825c
Action.c(32): LBase_64: i+b5VpgA7Ueis8r1bxBTJg==
 
Action.c(23): smp_UUID: 3f8eb05e-9936-b5fc-6be9-454fd8fb9ab5
Action.c(26): slr_UUID: cc835158-9e86-4df5-8a4e-1e3f25808754
Action.c(29): Win_UUID: 3d604abe-046b-43dc-a5c4-e759fb04f960
Action.c(32): LBase_64: Rk2mSYUuOUmU0Yti_W+a5Q==

If you have a different function to generate UUID in Loadrunner, I would love to know about it.

Thursday, June 7, 2012

Plagiarizing someone else experience

Whenever I get a "Join my network on LinkediIn" message from someone on LinkedIn, I always try to view their profile before accepting it. This is because I just like to know a little bit more about them.

Recently, I received a join message from Manish Sinha(works for Accenture(Bengaluru - India) as a performance test lead) and as always, before accepting it, I viewed his profile and what I found was bit of a surprise. He was plagiarizing someone else experience on his profile as his own and guess what, that was my experience he was plagiarizing.

I emailed him couple of times to remove the experience from his profile but so far no luck. Therefore, I thought, I blog about it.

His Experience as ASc Consultant at Capgemini.


Can you see the similarity with my experience.

Friday, June 1, 2012

Publishing result in Silkperformer

SilkPerformer reports percentiles in a different section than the main table and it can be time consuming, if you want to publish all the metrics in a single table. Therefore to solve this issue, a colleague (Murray Wardle) of mine wrote a visual basic script that generates a table with all the metrics.

He has kindly allowed me to share it here and below is his description on how to use it.

"Publishing results from SilkPerformer can sometimes be very time consuming. Most projects will have requirements involving the 90th or 95th percentiles and for some reason SilkPerformer reports percentiles in a different section of the report and not in the main table I wish to publish.

Generally in my scripts I’ll use Timers for measuring response times (I’m not too keen of the automatic page and form timers) for timers controlled with the MeasureStart() and MeasureStop() functions, Inserting the following into the TInit will enable percentiles to be calculated for the Timers.

MeasureCalculatePercentiles(NULL,MEASURE_TIMER_RESPONSETIME);

Unfortunately percentiles are displayed in a different section of the report to the Min, Avg, Max, StdDev, Count, and it’s a waste of time trying to copy and paste the values into a spreadsheet.

So, here is a simple little script which does the work. Just drag and drop the OverviewReport.xml file onto the script and it will create a csv file with the following:

ScriptName, TimerName, Min, Avg, Max, StDev, Count, 50th Perc, 90th Perc, 95th Perc, 99th Perc"


NOTE: You are allowed to use the code as long as you acknowledge the author.

'Copyright (c) 2012 Murray Wardle, murray.wardle@advancedperformance.com.au
'Permission is hereby granted, free of charge, to any person obtaining a copy of this software and associated documentation files (the "Software"), to deal in the Software without restriction, including without limitation the rights to use, copy, modify, merge, publish, distribute, sub license, and/or sell copies of the Software, and to permit persons to whom the Software is furnished to do so, subject to the following conditions:
'The above copyright notice and this permission notice shall be included in all copies or substantial portions of the Software.
'THE SOFTWARE IS PROVIDED "AS IS", WITHOUT WARRANTY OF ANY KIND, EXPRESS OR IMPLIED, INCLUDING BUT NOT LIMITED TO THE WARRANTIES OF MERCHANTABILITY, FITNESS FOR A PARTICULAR PURPOSE AND NON INFRINGEMENT. IN NO EVENT SHALL THE AUTHORS OR COPYRIGHT HOLDERS BE LIABLE FOR ANY CLAIM, DAMAGES OR OTHER LIABILITY, WHETHER IN AN ACTION OF CONTRACT, TORT OR OTHERWISE, ARISING FROM, OUT OF OR IN CONNECTION WITH THE SOFTWARE OR THE USE OR OTHER DEALINGS IN THE SOFTWARE. 

Option Explicit

Dim xmlDoc
Dim scriptName, scriptNodes, SNode, TNode, timerNodes, timerName
Dim reportFile, outputFile
Dim myFSO, fileHandle
Dim min, avg, max, stDev, count, p50, p90, p95, p99
Set xmlDoc = CreateObject("Microsoft.XMLDOM") 

Const ForReading = 1, ForWriting = 2, ForAppending = 8 

If Wscript.Arguments.Count = 0 Then
    msgbox "Please specify the overview Report file to process"
Else

 ' Get report file name & set output filename
    reportFile = Wscript.Arguments(0) 
 outputFile = Left(reportFile, Len(reportFile)-3) + "csv"

 xmlDoc.async = false 
 xmlDoc.SetProperty "SelectionLanguage", "XPath" 
 xmlDoc.SetProperty "ServerHTTPRequest", True
 xmlDoc.validateOnParse = False 
 xmlDoc.resolveExternals = False

 'load overview report
 xmlDoc.load(reportFile)
 xmlDoc.setProperty "SelectionLanguage", "XPath"  

 'open csv file to dump results into
 Set myFSO = CreateObject("Scripting.FileSystemObject")
 Set fileHandle = myFSO.OpenTextFile(outputFile, ForWriting, True)
 fileHandle.WriteLine("Script,Timer,Min,Avg,Max,StDev,Count,50th Perc,90th Perc,95th Perc,99th Perc")

 'For each script
 Set scriptNodes = xmlDoc.selectNodes("/Overview_Report_Data/UserGroups/Group") 
 For Each SNode in scriptNodes 
  scriptName = SNode.SelectSingleNode("Name").text

  'For each measure of type Timer
  Set timerNodes = SNode.selectNodes("Measures/Measure") 
  For Each TNode in timerNodes 
   If TNode.SelectSingleNode("Class").text = "Timer" then
   
    ' Extract the timer data
    timerName = TNode.SelectSingleNode("Name").text
    min = TNode.SelectSingleNode("MinMin").text
    avg = TNode.SelectSingleNode("Avg").text
    max = TNode.SelectSingleNode("MaxMax").text
    stDev = TNode.SelectSingleNode("Stdd").text
    count = TNode.SelectSingleNode("SumCount2").text
    p50 = TNode.SelectSingleNode("Percentiles/Values/Value[1]/Value").text
    p90 = TNode.SelectSingleNode("Percentiles/Values/Value[2]/Value").text
    p95 = TNode.SelectSingleNode("Percentiles/Values/Value[3]/Value").text
    p99 = TNode.SelectSingleNode("Percentiles/Values/Value[4]/Value").text

    'Write to File
    fileHandle.WriteLine(scriptName+","+timerName+","+min+","+avg+","+max+","+stDev+","+count+","+p50+","+p90+","+p95+","+p99)
   
   end if
  
  Next 'TNode in timerNodes 

 Next 'SNode in scriptNodes
 
 fileHandle.Close
 
End If


Example:
1: Save the above code as a visual basic script into a folder. Lets call this script as "ExtractOverviewReportData.vbs".
2: Navigate to you SilkPerformer project and copy OverviewReport.xml into the folder where you have saved vbs script. See the screenshot below.
When you open the xml file, it would look something like this:


  1.100000000
  ABCDEFG
   ForMyBlog.tsd (D:\Silkperformer_Projects\ABCDEF\) 
  Silk Performance Explorer
  Monday, 20 April 2012 - 3:00:00 AM
  1
  
Header ABCD 8 None 1 28/05/2012 1:00:12 AM 6280.000000000 4 Merged MPPO SVT 23
... Timer #Overall Response Time# Response time[s] Seconds 0.000000000 0.000000000 3 2 Response time[s] 200.000000000 100.000000000 830.000000000 35000.000000000 0.500000000 60.00000000 6.412345678 11.123456789 0.000000000 0 0.000000000 0 0 0 50 1.123456789 90 22.123456789 95 60.00000000 99 60.00000000 ...
3:Now drag and drop the OverviewReport.xml file onto the script and it will create a csv file.
4: Now open up the csv file in excel and you should have all the necessary metric. You will see something like this:

Monday, May 21, 2012

Querying and Inserting records into MongoDB using LoadRunner

This simple LR script inserts and retrieves a record from mongoDB. You can modify it to accommodate your own need.

Requirement:
Download Java driver for mongoDB and add it to the classpath in the java script.


import java.lang.String;
import java.net.UnknownHostException;
import java.util.Set;
import com.mongodb.BasicDBObject;
import com.mongodb.DB;
import com.mongodb.DBCollection;
import com.mongodb.DBCursor;
import com.mongodb.DBObject;
import com.mongodb.Mongo;
import com.mongodb.MongoException;

import lrapi.lr;
public class Actions
{ 
    static String HostName ="localhost";  
    static Integer Port = 27017;
    static String Username ="Harinder";
    static String Password ="Password";
    Mongo mDB;
    DB db;

 public int init() throws Throwable{
    try { 
        mDB= new Mongo( HostName , Port ); //connect to MongoDB using HostName and Port
        db = mDB.getDB("test"); // get test database from MongoDB
        boolean auth = db.authenticate(Username, Password.toCharArray()); //authenticate user access to test database
        if (auth = true) 
           lr.output_message("Successfully Authenticated");
        else
           lr.output_message("Incorrect Username/Password");

     }catch (UnknownHostException e) {
        e.printStackTrace();
    }
     return 0;
   }//end of init function

 public int action() throws Throwable {
     try { 
          InsertInToMongoDB("Harinder1", "Seera1", "ThisIsMongoDB1@gmail.com");
 
         }catch (MongoException e){
          e.printStackTrace();
         }

     try { 
         SearchMongoDB("Harinder");
 
         }catch (MongoException e){
          e.printStackTrace();
        }
 return 0;
 }//end of action function


 public int end() throws Throwable {
     mDB.close();
  return 0;
 }//end of end function


   public void InsertInToMongoDB(String FirstName, String LastName, String Email)
   { 
       // Get collection from mongoDB.
       // If collection doesn't exist, mongoDB will create it automatically
       DBCollection collection = db.getCollection("MyCollection");
       BasicDBObject document = new BasicDBObject();  // create a document to store key and value
       document.put("FirstName",FirstName);
       document.put("LastName", LastName);
       document.put("Email", Email);
       collection.insert(document);   //save the document into collection
   }


   public void SearchMongoDB(String FirstName)
   { 
       DBCollection collection = db.getCollection("MyCollection");
       BasicDBObject srchQuery = new BasicDBObject(); // search query
       srchQuery.put("FirstName", FirstName);
       DBCursor cur = collection.find(srchQuery); // query it
 
       // loop over the cursor and display the retrieved result
       while (cur.hasNext()) {
         System.out.println(cur.next()); //I am using it only for the blog purpose to show the output.
   }
 }
}

mongoDB output: